> ## Documentation Index
> Fetch the complete documentation index at: https://docs.runchat.com/llms.txt
> Use this file to discover all available pages before exploring further.
# Apps on the canvas
> Build interactive tools on the canvas that you and the agent drive together, through shared state and commands
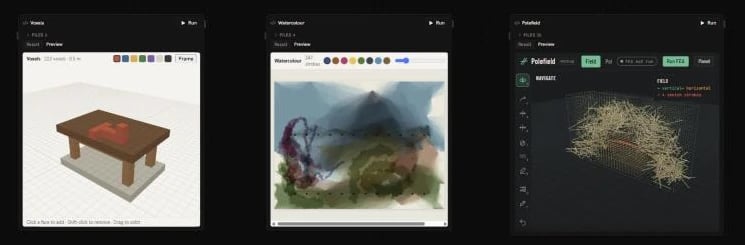
An app is an HTML Code node with its own interface: a voxel modeller, a watercolour painter, a building designer. Apps on the canvas can keep their document in **shared state**, so everyone with the workflow open sees the same thing, and expose **commands**, so the agent can use the app the same way you do.
 This page covers apps you work with inside a workflow. To publish an app as a web page other people can use, see [Publishing apps](/concepts/publishing/app-view).
## Making an app
Ask the agent: "make an app for sketching voxel furniture", "build a terrain designer I can sculpt and send to the scene". It writes the app into an HTML Code node, splitting larger apps into several files, and checks how the app looks before handing it back.
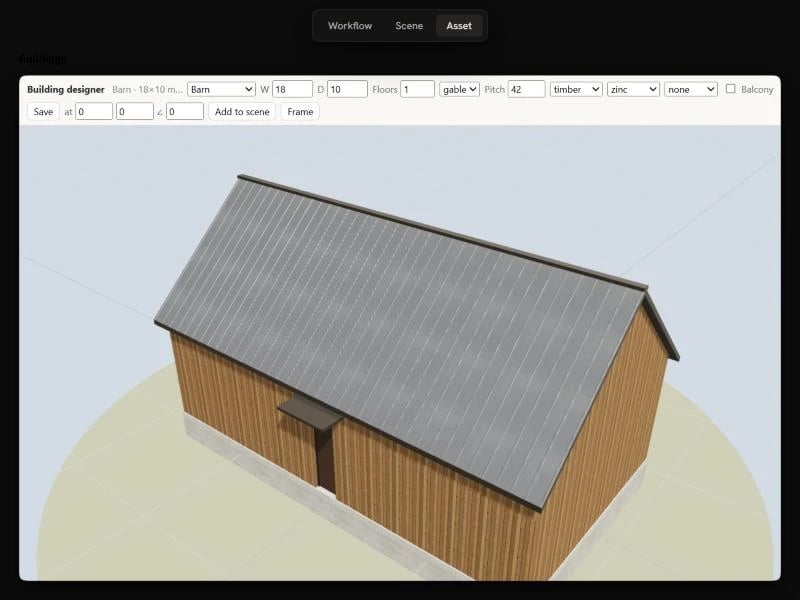
To see an app at full size, select its node and choose **Asset** in the switch at the top of the editor.
This page covers apps you work with inside a workflow. To publish an app as a web page other people can use, see [Publishing apps](/concepts/publishing/app-view).
## Making an app
Ask the agent: "make an app for sketching voxel furniture", "build a terrain designer I can sculpt and send to the scene". It writes the app into an HTML Code node, splitting larger apps into several files, and checks how the app looks before handing it back.
To see an app at full size, select its node and choose **Asset** in the switch at the top of the editor.
 ## Shared state
Shared state is where an app keeps its document: the strokes of a painting, the voxels of a model, the parameters of a building. It is stored with the workflow, not in your browser, so:
* **Everyone sees the same app.** Open the workflow in two tabs, or alongside a teammate, and changes show up in both straight away.
* **The agent can read it.** Ask "how many voxels are there?" or "what pitch is the roof?" and the agent reads the answer from the app's state.
* **It's saved with the workflow.** State is backed up with the canvas, restored with earlier versions, and kept when you copy the workflow. Copying and pasting an app node copies its state too.
Each value records who last wrote it, whether that was you, a teammate or an agent.
Things that are only about your view, like the camera angle or what you have selected, stay out of shared state, so you and the agent can look at the same app from different angles.
## Commands
Commands are the actions an app offers: `add_voxels`, `paint_stroke`, `set_params`, `add_to_scene`. The app's own buttons call them, and the agent calls the same commands with the same arguments, so whatever you can do by clicking, the agent can do by asking.
To drive an app, ask the agent in plain terms: "add a table top two voxels thick", "paint a sunset over the hills", "make the barn 24 m long with a zinc roof". The agent reads the app's commands and current state, runs the commands that fit, and looks at the result. Its changes appear live in the app.
Commands run on Runchat's servers, not in your browser, so an agent can use an app even when nobody has it open. Each command costs 1 credit.
Commands need the workflow to be saved. Only the workflow's owner and their
teammates can run commands that change an app; anyone who can view the
workflow can read it.
## Apps and the scene
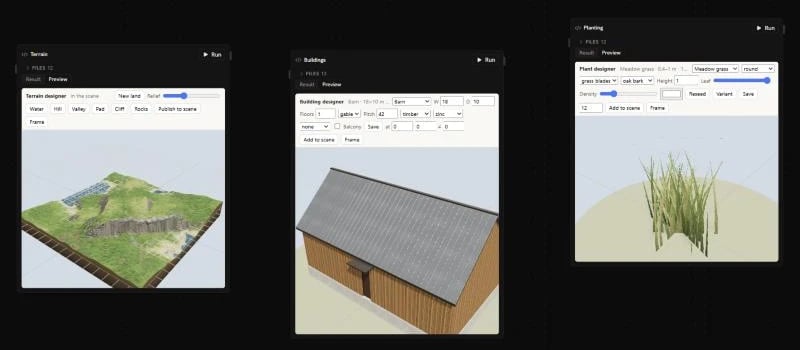
Apps can build in the workflow's [Scene](/concepts/editor/scene). A command can add simple shapes, or generate a full mesh with materials and textures, which Runchat saves as a model file and places in the scene. Each app keeps its objects in its own group, and can read everything else in the scene, so a planting app can scatter trees on the terrain another app made.
A good pattern for these apps is the **design tool**: the app works on one design at a time in its own preview, and only places it in the scene when you choose **Add to scene** (or **Publish to scene**). Placed designs can then be moved, replaced or removed later.
## Shared state
Shared state is where an app keeps its document: the strokes of a painting, the voxels of a model, the parameters of a building. It is stored with the workflow, not in your browser, so:
* **Everyone sees the same app.** Open the workflow in two tabs, or alongside a teammate, and changes show up in both straight away.
* **The agent can read it.** Ask "how many voxels are there?" or "what pitch is the roof?" and the agent reads the answer from the app's state.
* **It's saved with the workflow.** State is backed up with the canvas, restored with earlier versions, and kept when you copy the workflow. Copying and pasting an app node copies its state too.
Each value records who last wrote it, whether that was you, a teammate or an agent.
Things that are only about your view, like the camera angle or what you have selected, stay out of shared state, so you and the agent can look at the same app from different angles.
## Commands
Commands are the actions an app offers: `add_voxels`, `paint_stroke`, `set_params`, `add_to_scene`. The app's own buttons call them, and the agent calls the same commands with the same arguments, so whatever you can do by clicking, the agent can do by asking.
To drive an app, ask the agent in plain terms: "add a table top two voxels thick", "paint a sunset over the hills", "make the barn 24 m long with a zinc roof". The agent reads the app's commands and current state, runs the commands that fit, and looks at the result. Its changes appear live in the app.
Commands run on Runchat's servers, not in your browser, so an agent can use an app even when nobody has it open. Each command costs 1 credit.
Commands need the workflow to be saved. Only the workflow's owner and their
teammates can run commands that change an app; anyone who can view the
workflow can read it.
## Apps and the scene
Apps can build in the workflow's [Scene](/concepts/editor/scene). A command can add simple shapes, or generate a full mesh with materials and textures, which Runchat saves as a model file and places in the scene. Each app keeps its objects in its own group, and can read everything else in the scene, so a planting app can scatter trees on the terrain another app made.
A good pattern for these apps is the **design tool**: the app works on one design at a time in its own preview, and only places it in the scene when you choose **Add to scene** (or **Publish to scene**). Placed designs can then be moved, replaced or removed later.
 ## Building apps yourself
You can write apps by hand, or with a coding agent such as Claude Code, using the [Runchat CLI](/concepts/integrations/cli):
```bash theme={null}
runchat init my-app
runchat create_runchat --name "My app"
runchat deploy my-app --runchat_id
```
`init` scaffolds an app with an `index.html`, a `src` folder for the interface and a `commands.js`. `deploy` uploads the folder to the canvas as an HTML Code node; pass `--node_id` to update an app you deployed before. Apps are bundled with esbuild, so you can split code into ES modules and add npm packages in a `package.json`.
### State in the browser
The app's page talks to Runchat through the `window.runchat` object, which is already there when the page loads:
```js theme={null}
runchat.state.subscribe((state) => render(state));
await runchat.state.apply([
{ op: "append", key: "strokes", items: [stroke] },
]);
const result = await runchat.command("add_voxels", { cells: [[0, 0, 0]] });
```
| Method | What it does |
| - | - |
| `runchat.state.subscribe(fn)` | Calls `fn` with the full shared state now and on every change. Returns a function that unsubscribes |
| `runchat.state.apply(ops)` | Applies a list of changes in one step |
| `runchat.state.get(key)` / `set(key, value)` | Reads or writes one key. Pass `{ scope: "shared" }` for shared state; the default is the viewer's own state |
| `runchat.command(name, args)` | Runs one of the app's commands and returns its result |
| `runchat.scene.subscribe(fn)` | Calls `fn` with the objects in the workflow's scene |
| `runchat.scene.edit(ops)` | Edits the scene as the person using the app |
The changes `apply` accepts:
| Op | Fields | Effect |
| - | - | - |
| `set` | `key`, `value` | Replaces a key |
| `merge` | `key`, `value` | Shallow-merges an object into a key |
| `append` | `key`, `items`, optional `max` | Adds items to a list, keeping at most `max` |
| `delete` | `key` | Removes a key |
| `clear` | | Removes every key |
### Writing commands
Commands live in `commands.js` (or `commands.ts`). Each one has a description and a JSON schema for its input, written for an agent that has never seen the app, and a `run` function that takes the arguments and the current state and returns the changes to make:
```js commands.js theme={null}
export const commands = {
add_voxels: {
description: "Add voxels at integer grid cells.",
input: {
type: "object",
properties: {
cells: { type: "array", items: { type: "array", items: { type: "number" } } },
color: { type: "string" },
},
required: ["cells"],
},
run({ cells, color = "#c8553d" }, { state }) {
const voxels = { ...(state.voxels ?? {}) };
for (const [x, y, z] of cells) voxels[`${x},${y},${z}`] = color;
return {
ops: [{ op: "set", key: "voxels", value: voxels }],
result: { count: Object.keys(voxels).length },
};
},
},
};
```
`result` goes back to whoever ran the command. Commands run in a sandbox without a page, so keep them to plain calculation: no DOM, no three.js scene. Put shared maths in your own modules and import it from both the commands and the interface, so the preview and the commands always agree.
Two commands are worth adding to every app: a read-only `describe` that summarises the state, and an `export` that returns the app's geometry or data in plain units, so agents can move work between apps.
To build in the scene, a command can also return `scene` (edits in the same form as the `edit_scene` tool) and `meshes` (vertex data that Runchat turns into a model file). The `html-code` skill has the full reference: run `runchat use_skill --name html-code`.
### Driving an app from the CLI
The same commands are available to external agents through the CLI and the [MCP server](/concepts/integrations/mcp):
```bash theme={null}
runchat read_app --runchat_id --node_id
runchat app_command --runchat_id --node_id --command add_voxels --args '{"cells":[[0,0,0]]}'
```
| Tool | What it does |
| - | - |
| `read_app` | Lists an app's commands and current state, or the apps on a canvas when no node is given |
| `app_command` | Runs one of the app's commands |
| `edit_app_state` | Writes state directly, for when no command fits |
## Limits
* Each state key holds up to 256 KB. Split large documents across several keys.
* Up to 1,000 keys per app, and up to 200 changes in one step.
* On a [published app](/concepts/publishing/app-view), shared state can only be written by the app's owner, and live updates and commands are not available yet.
This documentation is built and hosted on [Mintlify](https://mintlify.com), a developer documentation platform.
## Building apps yourself
You can write apps by hand, or with a coding agent such as Claude Code, using the [Runchat CLI](/concepts/integrations/cli):
```bash theme={null}
runchat init my-app
runchat create_runchat --name "My app"
runchat deploy my-app --runchat_id
```
`init` scaffolds an app with an `index.html`, a `src` folder for the interface and a `commands.js`. `deploy` uploads the folder to the canvas as an HTML Code node; pass `--node_id` to update an app you deployed before. Apps are bundled with esbuild, so you can split code into ES modules and add npm packages in a `package.json`.
### State in the browser
The app's page talks to Runchat through the `window.runchat` object, which is already there when the page loads:
```js theme={null}
runchat.state.subscribe((state) => render(state));
await runchat.state.apply([
{ op: "append", key: "strokes", items: [stroke] },
]);
const result = await runchat.command("add_voxels", { cells: [[0, 0, 0]] });
```
| Method | What it does |
| - | - |
| `runchat.state.subscribe(fn)` | Calls `fn` with the full shared state now and on every change. Returns a function that unsubscribes |
| `runchat.state.apply(ops)` | Applies a list of changes in one step |
| `runchat.state.get(key)` / `set(key, value)` | Reads or writes one key. Pass `{ scope: "shared" }` for shared state; the default is the viewer's own state |
| `runchat.command(name, args)` | Runs one of the app's commands and returns its result |
| `runchat.scene.subscribe(fn)` | Calls `fn` with the objects in the workflow's scene |
| `runchat.scene.edit(ops)` | Edits the scene as the person using the app |
The changes `apply` accepts:
| Op | Fields | Effect |
| - | - | - |
| `set` | `key`, `value` | Replaces a key |
| `merge` | `key`, `value` | Shallow-merges an object into a key |
| `append` | `key`, `items`, optional `max` | Adds items to a list, keeping at most `max` |
| `delete` | `key` | Removes a key |
| `clear` | | Removes every key |
### Writing commands
Commands live in `commands.js` (or `commands.ts`). Each one has a description and a JSON schema for its input, written for an agent that has never seen the app, and a `run` function that takes the arguments and the current state and returns the changes to make:
```js commands.js theme={null}
export const commands = {
add_voxels: {
description: "Add voxels at integer grid cells.",
input: {
type: "object",
properties: {
cells: { type: "array", items: { type: "array", items: { type: "number" } } },
color: { type: "string" },
},
required: ["cells"],
},
run({ cells, color = "#c8553d" }, { state }) {
const voxels = { ...(state.voxels ?? {}) };
for (const [x, y, z] of cells) voxels[`${x},${y},${z}`] = color;
return {
ops: [{ op: "set", key: "voxels", value: voxels }],
result: { count: Object.keys(voxels).length },
};
},
},
};
```
`result` goes back to whoever ran the command. Commands run in a sandbox without a page, so keep them to plain calculation: no DOM, no three.js scene. Put shared maths in your own modules and import it from both the commands and the interface, so the preview and the commands always agree.
Two commands are worth adding to every app: a read-only `describe` that summarises the state, and an `export` that returns the app's geometry or data in plain units, so agents can move work between apps.
To build in the scene, a command can also return `scene` (edits in the same form as the `edit_scene` tool) and `meshes` (vertex data that Runchat turns into a model file). The `html-code` skill has the full reference: run `runchat use_skill --name html-code`.
### Driving an app from the CLI
The same commands are available to external agents through the CLI and the [MCP server](/concepts/integrations/mcp):
```bash theme={null}
runchat read_app --runchat_id --node_id
runchat app_command --runchat_id --node_id --command add_voxels --args '{"cells":[[0,0,0]]}'
```
| Tool | What it does |
| - | - |
| `read_app` | Lists an app's commands and current state, or the apps on a canvas when no node is given |
| `app_command` | Runs one of the app's commands |
| `edit_app_state` | Writes state directly, for when no command fits |
## Limits
* Each state key holds up to 256 KB. Split large documents across several keys.
* Up to 1,000 keys per app, and up to 200 changes in one step.
* On a [published app](/concepts/publishing/app-view), shared state can only be written by the app's owner, and live updates and commands are not available yet.
This documentation is built and hosted on [Mintlify](https://mintlify.com), a developer documentation platform.