> ## Documentation Index
> Fetch the complete documentation index at: https://docs.runchat.com/llms.txt
> Use this file to discover all available pages before exploring further.
# Publishing Tools
> Step-by-step guide to publishing a workflow as a reusable Tool, plus building custom UI nodes with React
A Tool is a published workflow that can be dropped into other workflows as a single node, used by the [chat agent](/concepts/agents/chat), or called via the [Runchat API](/api-reference/endpoint/run). For an overview of how Tools fit alongside Apps and Libraries, see [Tools, Apps, and Libraries](/concepts/publishing/libraries).
## Publishing a Tool
Publishing a Tool and publishing an App are the same flow. You configure which inputs and outputs to expose in the **app preview**, then click Publish. Whoever opens the result gets either the App view or a Tool node in their canvas, depending on context.
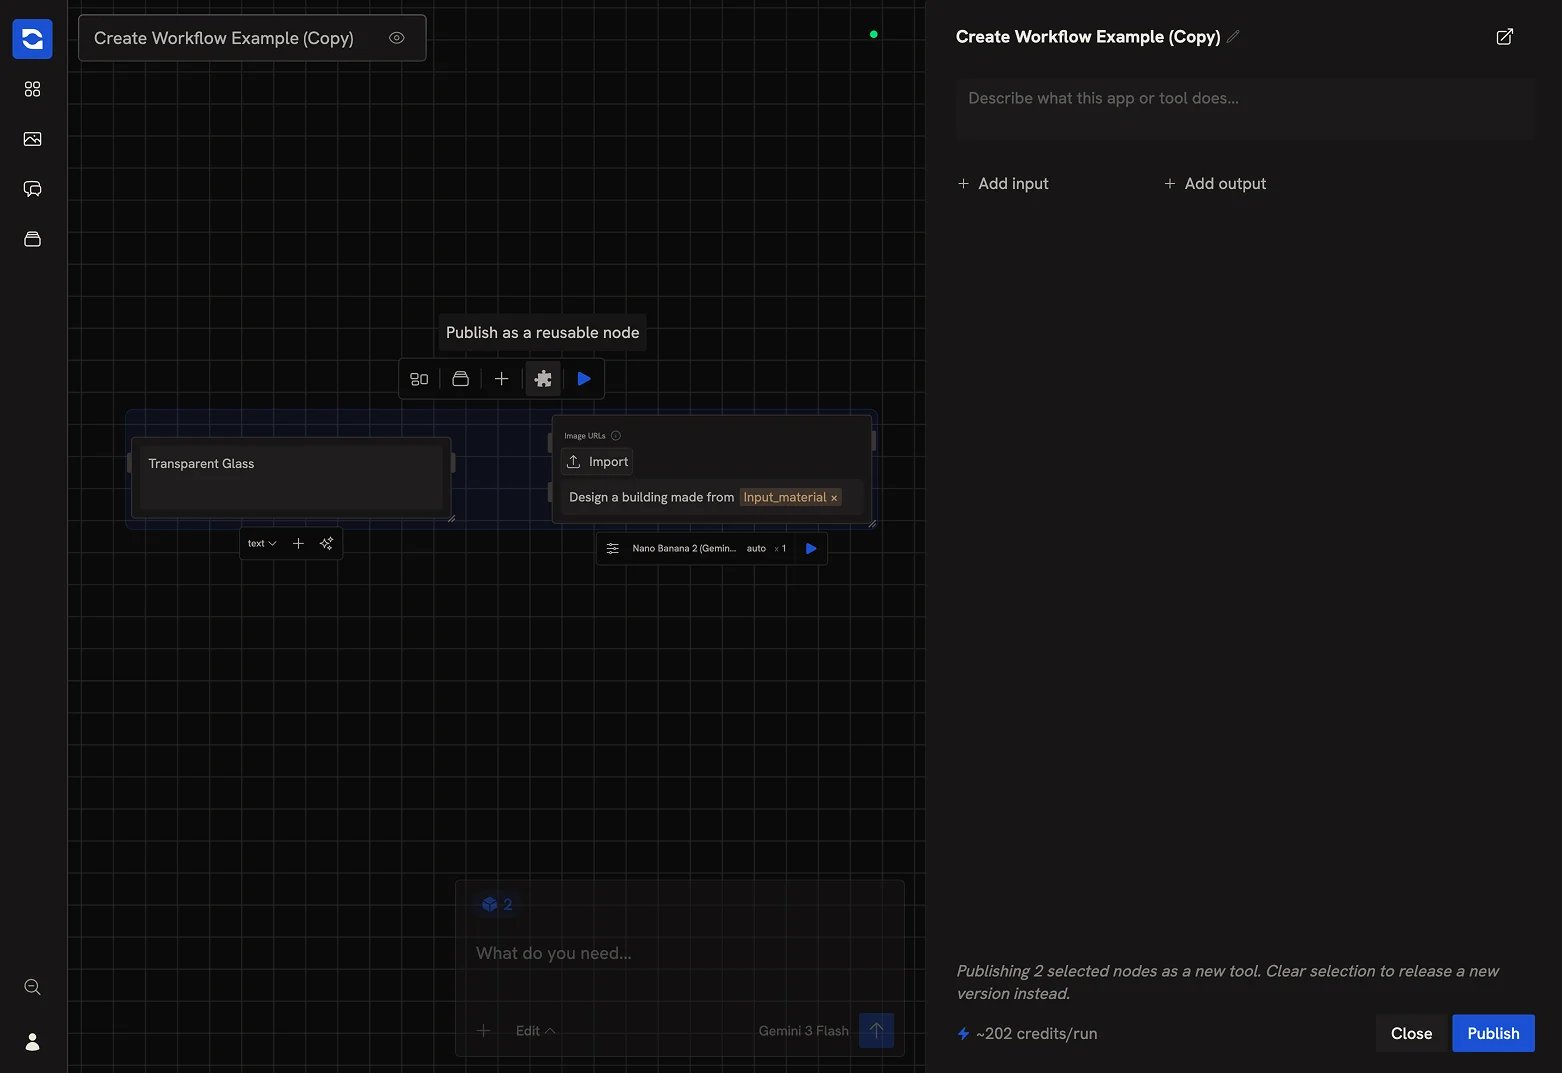
1. Select the nodes you want to include in the Tool, then click the **puzzle piece** icon to open the app preview:
* For a single node, the puzzle piece appears next to the node's settings bar
* For multiple nodes, it appears in the selection toolbar at the top of the canvas
2. Choose which inputs and outputs to publish. The preview has an **Inputs** side and an **Outputs** side — switch between them with the toggle in the toolbar at the bottom of the panel:
* Use **Add input parameter to tool** / **Add output parameter to tool** to select parameters to expose
* Hover over a published parameter and click the X to remove it
3. Click **Publish** at the bottom-left. A confirmation opens where you set a thumbnail and description and see a credit-per-run estimate; click **Publish** there to confirm. Subsequent publishes increment the version (Publish v2, v3, and so on).
You can also open the app preview without selecting nodes by clicking your workflow's title (or the chevron beside it) in the top bar.
Most Tools should expose only a few inputs and often only a single output. Publishing every parameter usually makes the Tool too cluttered to use.
 ## Adding parameter descriptions
Click a published parameter's label in the app preview (or on the canvas) to expand and add a description. Descriptions are essential when the Tool will be used by an [agent](/concepts/publishing/agent-tools), the agent reads them to decide what to pass in. They're also useful for your future self: you will forget what your inputs do.
## Adding the Tool to a Library
To make the Tool show up in the node picker and reusable across workflows, [add it to a library](/concepts/publishing/libraries#libraries).
Published Tools are saved as workflows. You can browse and organise them from the Workflows panel just like any other Runchat.
## Writing a good description
The description on a Tool is what the agent reads when deciding whether to use it. Treat it like you're describing the Tool to a smart assistant who has no context.
Answer:
* What does it take in?
* What does it give back?
* When would you reach for it?
**Bad**: *"Style transfer tool"*
**Good**: *"Takes an input image and applies the visual style from a reference image. Use when you want to transfer the look of one image (a sketch, a painting, a brand reference) onto a new subject. Returns a single image."*
## Custom UI nodes (Client nodes)
When you publish a workflow as a Tool, the Tool's UI is determined by the published parameters. If you need full control over the input or output UI, you can build a Client node using arbitrary React code.
Client nodes are useful for interactions that need to happen in the browser rather than on the server, for example:
* Painting masks on an image
* Compositing multiple images
* Editing audio or trimming video
* Custom drawing or sketching tools
* Interactive parameter pickers
Client nodes can be published the same way as Tools and shared via libraries. They appear in the node picker and can be used by the chat agent like any other Tool.
## Next steps
* [Tools, Apps, and Libraries](/concepts/publishing/libraries): how Tools fit alongside Apps and Libraries
* [Agent Tools](/concepts/publishing/agent-tools): make your Tool callable by the chat agent
* [App View](/concepts/publishing/app-view): the same publish flow viewed through the App lens
## Adding parameter descriptions
Click a published parameter's label in the app preview (or on the canvas) to expand and add a description. Descriptions are essential when the Tool will be used by an [agent](/concepts/publishing/agent-tools), the agent reads them to decide what to pass in. They're also useful for your future self: you will forget what your inputs do.
## Adding the Tool to a Library
To make the Tool show up in the node picker and reusable across workflows, [add it to a library](/concepts/publishing/libraries#libraries).
Published Tools are saved as workflows. You can browse and organise them from the Workflows panel just like any other Runchat.
## Writing a good description
The description on a Tool is what the agent reads when deciding whether to use it. Treat it like you're describing the Tool to a smart assistant who has no context.
Answer:
* What does it take in?
* What does it give back?
* When would you reach for it?
**Bad**: *"Style transfer tool"*
**Good**: *"Takes an input image and applies the visual style from a reference image. Use when you want to transfer the look of one image (a sketch, a painting, a brand reference) onto a new subject. Returns a single image."*
## Custom UI nodes (Client nodes)
When you publish a workflow as a Tool, the Tool's UI is determined by the published parameters. If you need full control over the input or output UI, you can build a Client node using arbitrary React code.
Client nodes are useful for interactions that need to happen in the browser rather than on the server, for example:
* Painting masks on an image
* Compositing multiple images
* Editing audio or trimming video
* Custom drawing or sketching tools
* Interactive parameter pickers
Client nodes can be published the same way as Tools and shared via libraries. They appear in the node picker and can be used by the chat agent like any other Tool.
## Next steps
* [Tools, Apps, and Libraries](/concepts/publishing/libraries): how Tools fit alongside Apps and Libraries
* [Agent Tools](/concepts/publishing/agent-tools): make your Tool callable by the chat agent
* [App View](/concepts/publishing/app-view): the same publish flow viewed through the App lens