> ## Documentation Index
> Fetch the complete documentation index at: https://docs.runchat.com/llms.txt
> Use this file to discover all available pages before exploring further.
# Artifact
> Create, update, or fetch published artifacts (websites, blog posts, slides) from a workflow
The Artifact node is used to draft and publish [websites, blog posts and slides](/concepts/dashboard/artifacts) to your public URL.
## Operation modes
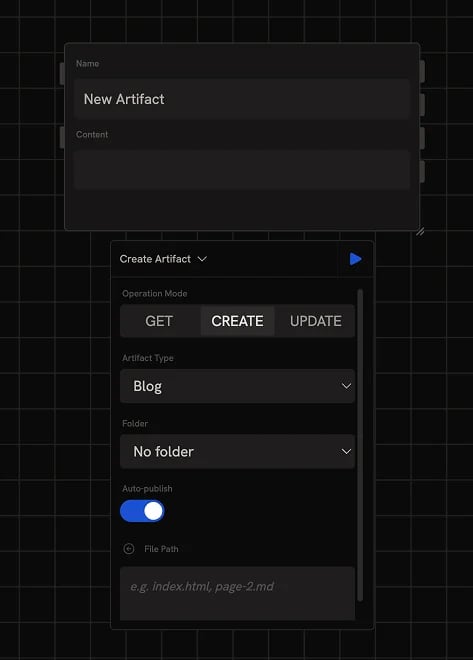 The Artifact node has three modes, switched from the config panel that opens from the node's settings bar:
* **Create**: make a new artifact from connected content
* **Update**: replace an existing artifact's content
* **Get**: fetch the content of an existing artifact
The mode determines which inputs are visible on the node (name only appears for Create, artifact\_id appears for Update and Get, etc.).
## Create mode
Create mode is selected by default when you add a new Artifact node to the canvas. Connect content (markdown, HTML, or generated text) to the **Content** input and give it a **Name**.
### Artifact type
The node tries to infer the appropriate type (website, blog, or slides) from the content's format. To override, pick a type from the **Artifact Type** dropdown in the config panel:
* **Website**: HTML pages with optional CSS and JS
* **Blog**: long-form markdown writing
* **Slides**: presentation decks
### Auto-publish
By default, every run publishes the artifact to the public web immediately. Disable **Auto-publish** in the config panel if you'd rather review drafts on the [Artifacts dashboard](https://runchat.com/dashboard/artifacts) before publishing manually.
### Folders
When publishing many artifacts, pick a **Folder** in the config panel to organize them. The dropdown lists folders you've already created on the [Artifacts dashboard](https://runchat.com/dashboard/artifacts), create folders there before assigning them here.
## Update mode
Update mode replaces an existing artifact's content. Provide the **Artifact ID** (either picked from the dropdown or wired in from another node) and the new content.
### File path
By default, Update writes to the artifact's entry point file (e.g. `index.html` for a website, `content.md` for a blog). For multi-file artifacts, use the **File Path** parameter to target a specific file or page within the artifact.
## Get mode
Get mode fetches an existing artifact's content. Provide the **Artifact ID** (from the dropdown or wired in) and the node returns the current content. Useful for chaining: read an existing artifact, transform it with an Agent or Code node, and update or create a new version.
## Outputs
The node has four output parameters:
* **Content**: the artifact's content as text. Populated in Get mode; not returned by Create or Update.
* **Artifact ID**: the artifact's unique identifier. Newly assigned on Create, passed through on Update and Get.
* **URL**: the public URL if the artifact is published, in the form `runchat.com/p//`.
* **Thumbnail**: the artifact's thumbnail image URL.
## Next steps
* [Artifacts dashboard](/concepts/dashboard/artifacts): browse, edit, and publish artifacts
* [Agent node](/node-reference/nodes/agent): generate the content to feed into an Artifact
* [Code node](/node-reference/nodes/code): build HTML or markdown programmatically
* [Build and publish an artifact](/examples/build-and-publish-an-app): worked example
The Artifact node has three modes, switched from the config panel that opens from the node's settings bar:
* **Create**: make a new artifact from connected content
* **Update**: replace an existing artifact's content
* **Get**: fetch the content of an existing artifact
The mode determines which inputs are visible on the node (name only appears for Create, artifact\_id appears for Update and Get, etc.).
## Create mode
Create mode is selected by default when you add a new Artifact node to the canvas. Connect content (markdown, HTML, or generated text) to the **Content** input and give it a **Name**.
### Artifact type
The node tries to infer the appropriate type (website, blog, or slides) from the content's format. To override, pick a type from the **Artifact Type** dropdown in the config panel:
* **Website**: HTML pages with optional CSS and JS
* **Blog**: long-form markdown writing
* **Slides**: presentation decks
### Auto-publish
By default, every run publishes the artifact to the public web immediately. Disable **Auto-publish** in the config panel if you'd rather review drafts on the [Artifacts dashboard](https://runchat.com/dashboard/artifacts) before publishing manually.
### Folders
When publishing many artifacts, pick a **Folder** in the config panel to organize them. The dropdown lists folders you've already created on the [Artifacts dashboard](https://runchat.com/dashboard/artifacts), create folders there before assigning them here.
## Update mode
Update mode replaces an existing artifact's content. Provide the **Artifact ID** (either picked from the dropdown or wired in from another node) and the new content.
### File path
By default, Update writes to the artifact's entry point file (e.g. `index.html` for a website, `content.md` for a blog). For multi-file artifacts, use the **File Path** parameter to target a specific file or page within the artifact.
## Get mode
Get mode fetches an existing artifact's content. Provide the **Artifact ID** (from the dropdown or wired in) and the node returns the current content. Useful for chaining: read an existing artifact, transform it with an Agent or Code node, and update or create a new version.
## Outputs
The node has four output parameters:
* **Content**: the artifact's content as text. Populated in Get mode; not returned by Create or Update.
* **Artifact ID**: the artifact's unique identifier. Newly assigned on Create, passed through on Update and Get.
* **URL**: the public URL if the artifact is published, in the form `runchat.com/p//`.
* **Thumbnail**: the artifact's thumbnail image URL.
## Next steps
* [Artifacts dashboard](/concepts/dashboard/artifacts): browse, edit, and publish artifacts
* [Agent node](/node-reference/nodes/agent): generate the content to feed into an Artifact
* [Code node](/node-reference/nodes/code): build HTML or markdown programmatically
* [Build and publish an artifact](/examples/build-and-publish-an-app): worked example