Asking the chat agent to write code
The most common way to use the Code node is to let the chat agent write and maintain the code for you. Select a Code node and describe what you want it to do. The agent reads your existing code (if any), sees error messages from the last run, and applies changes line by line. See Agent Capabilities → Code Editing Tools for the full list of edits it can make. For complex tasks (multi-step logic, non-trivial data transformations), switch the chat agent to a flagship reasoning model like Claude Opus or Gemini 3 Pro before asking it to write code.Reviewing agent changes
When the agent edits code, the changed lines are highlighted in the editor and an Accept / Undo toolbar appears in the top-right corner with a count of changed lines. Click the green check to keep the changes or the undo arrow to revert. Manually editing the code clears the highlights and accepts the agent’s changes implicitly.Editing code yourself
You can also write or tweak code directly in the editor. The editor is intentionally minimal:- Standard text editing keybindings (cut, copy, paste, undo, redo)
- Ctrl+F auto-formats the whole script (works on Mac too, with literal Ctrl rather than Cmd)
Tabopens the credential picker. See Using credentials below.
Choosing a language mode
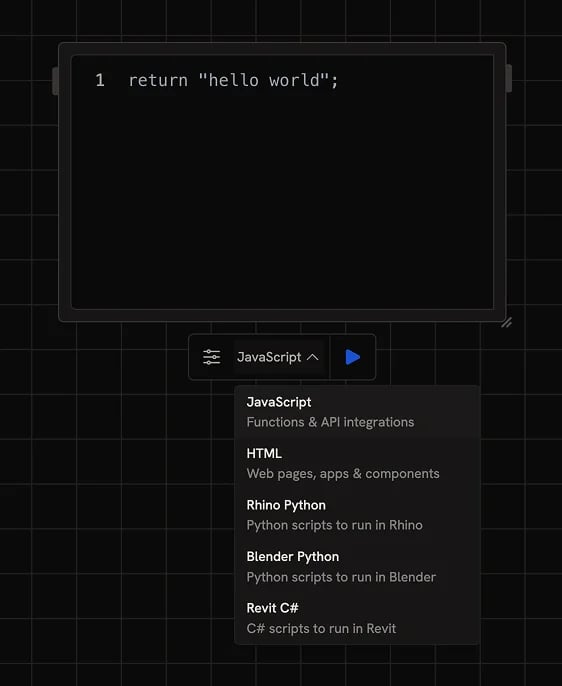
- HTML: renders a live web page in a preview panel. Use for interactive tools, dashboards, 3D viewers, and small apps.
- Rhino Python: runs inside the Rhino plugin on the active document
- Blender Python: runs inside the Blender plugin on the active document
- Revit C#: runs inside the Revit plugin on the active document
- JavaScript: runs server-side in a sandbox. Use for data wrangling, transforming values between nodes, calling APIs.
HTML mode
In HTML mode, your code is rendered as a live web page in the node. Use it for:- Building interactive tools (paint, color pickers, sliders, mask editors)
- 3D viewers using Three.js or similar
- Dashboards or data visualizations
- Quick UI prototypes
CAD plugin modes
When set to Rhino Python, Blender Python, or Revit C#, the code is sent to the matching desktop plugin to run on the active document. The Runchat node shows the script and the run button connects to your local Rhino/Blender/Revit instance via the bridge plugin. These modes are great for generating geometry, automating repetitive tasks, or scripting analyses.JavaScript mode
JavaScript runs in a sandboxed environment with a few important constraints:- Your code must
returna value. The runtime uses the return value as the node’s output. - External
imports andrequires are not available, you can only use built-in JavaScript. - The execution timeout is 60 seconds per item.
fetch().
fetch() requests cost 1 credit each in addition to the per-node run cost.
Networking requests can be used to send your data to unknown third parties; if
a workflow contains a code node that references your user credentials, you’ll
be warned and asked to proceed only if you trust the source.Why can’t I do x with the code node?Most Runchats use the code node in some way, often nested several nodes deep for doing various forms of data formatting and manipulation. It is crucial that this code cannot make any changes to your data or pc without your knowledge. By sandboxing all code and preventing access to modules we can provide a secure environment for running untrusted code without risking breaches.
Inputs and outputs
The Code node has only thecode input by default. To use other parameters in your script, add them with the Parameter Manager in the settings panel.
When the chat agent is helping you write code, it can also suggest and add parameters for you.
The output is rendered with a component that matches the returned data type:
- A returned URL to an image, video, 3D mesh, or PDF renders inline
- HTML strings render in a preview frame
- Markdown renders formatted
- JSON or arrays render in a paginated table
Parameter Manager
You can add input parameters from the node settings panel. Click the + icon to add one and the trash icon to remove it. Each parameter has:- A name you’ll reference in your script
- A data type that any incoming value will be cast to before your code runs
Each vs All on a parameter
Each parameter connection has an Each or All toggle on the edge (see Data Matching):- Each (default): the script runs once per item, with that item bound to the parameter name.
- All: all incoming items are passed in as a single array. Connect multiple inputs to the parameter and access them through array index notation, e.g.
inputData[1].
Using credentials
Reference any credential directly in your script withENV.<name> or ENV["<name>"]. Credentials are placeholders that only resolve to real values when sent to an allowed origin via fetch().
You can also press Tab in the code editor to open the credential picker and insert a credential by name.
Common errors
The sandbox always runs your code as a function and expects a return value. If your code doesn’t return anything, the node will throw:return statement to whatever value should be the output.
Next steps
- Data Matching: how Each and All interact with multi-input scripts
- Credentials: securely store and use API keys
- Agent Capabilities: tools the chat agent uses to edit code
- Generating Rhino scripts: worked example using Rhino Python mode